Your user account
As an HVL student, you will be assigned a user account and email account for the university's computer system.
Important information from HVL will be sent to this email address, and you are obligated to check it regularly. You will use your user account to log in to HVL's systems, such as student email, the Canvas learning platform, wireless network, Office365, and more.
- Your email: studentnumber@stud.hvl.no
- Your username: your student number
- You may find your student number at StudentWeb
- You have received your PIN on SMS (or email if you are an international student)
Activate account
To activate your HVL user account, you need to log in to https://konto.hvl.no and create a password. You log in with your username (student number) and PIN code.
Password
The password should have a combination of letters and numbers and must contain at least 9 characters. If you enter the wrong password multiple times and your account gets locked, it will automatically unlock itself after approximately 10 minutes, and you can try again.
Multi-factor authentication for your Windows account.
Activating Multi-factor Authentication
The risk of data breaches through identity theft is greater than ever before! Several large and small Norwegian companies and organizations have experienced this in recent years. The best way to avoid this is by using multi-factor authentication during login. HVL has been using this for accessing various services for many years. However, now we have the opportunity to standardize on a single authentication method over a period of time, which can replace the different methods we have been using. Additionally, for services that require a higher level of security, we will always need to use the highest level of authentication we have available, which includes the national IDs we have in ID-porten.
Multi-factor authentication provides an additional level of security during login. In addition to your password (something you know), you must also confirm it by using something you have (one-time code). This prevents others from logging in with your ID even if they know your password.
Feide login
When logging in to a service with Feide, you will be redirected to Moria, which is a common login service for all Feide services. For example, if you need to log in to the submission and examination system WISEflow, you must have created a user account in Feide.
Use the same username and password for logging in via Feide as you do for your HVL user account.
Here's how to log in with Feide:
- Select "Affiliation: Western Norway University of Applied Sciences."
- Click "Continue" and enter your username (your student number) and password.
- Click "Log in," and you will be redirected to the service.
Forgotten password.
If you have forgotten your password, you can create a new one by logging in to https://konto.hvl.no with your username (student number) and PIN code. You cannot choose a password that you have used before.
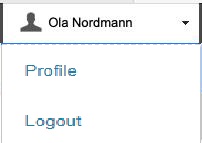
If you have forgotten your PIN code, you can create a new one on Studentweb using the following steps:
Log in to Studentweb with BankID/MinID.
Click on your name in the top right corner.
Click on "My Profile."
Scroll down until you reach "Account Administration," where you will see the option to change your PIN code.
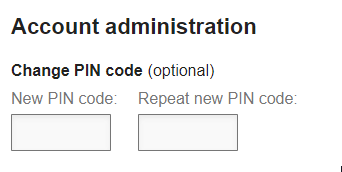
Remember to click "Save Changes" at the bottom of the page.

Closing an account
Your user account will be blocked 90 days after completing your study program or if you terminate your studies for any other reason. You are responsible for copying any data you want to keep before your studies are completed and the account is deactivated.
If you wish to continue using Office 365 and MS Office software that you have had access to as an HVL student, you will need to subscribe to a new license with Microsoft. Once you have subscribed to a new license on your personal Microsoft account, you can find user guides for transferring your files directly to your personal Microsoft account below: